• There seems to be an uptick in Political comments in recent months. Those of us who are long time members of the site know that Political and Religious content has been banned for years. Nothing has changed. Please leave all political and religious comments out of the forums.

    If you recently joined the forums you were not presented with this restriction in the terms of service. This was due to a conversion error when we went from vBulletin to Xenforo. We have updated our terms of service to reflect these corrections.

    Please note any post refering to a politician will be considered political even if it is intended to be humor. Our experience is these topics have a way of dividing the forums and causing deep resentment among members. It is a poison to the community. We appreciate compliance with the rules.

    The Staff of SOH

  • Server side Maintenance is done. We still have an update to the forum software to run but that one will have to wait for a better time.

First ever Nose Art

jmfabio

Charter Member
Hi All!!

Get out the bug spray, I am getting bitten.

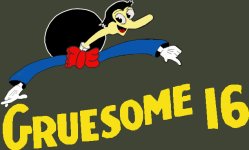
I present my first ever nose art done for my Pitoe Airdrome project.

attachment.php


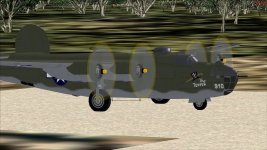
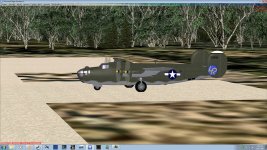
it is Gruesome 16, a B-24J of the 372nd BS of the 307th BG. This is just a pic of the nose art itself not placed yet on the plane. I put it on a green background for effect. I don't know the correct way to paint nose art or how others do it, but I loaded a photo of the art and the created a new layer. In the new layer I just colored as in a coloring book: outline and then fill in. The colors are of course artistic license as this was painted from a black and white photo. I tried to judge colors by tonal quality. May not be an exact or realistic color interpretation but I thinks these colors work well.

Well, many,many more to go.

As always, comments advice and constructive criticism welcome, as I am just a fledgling in the aspect of Flight Sim.

Thanks for looking,

Joe
 

Attachments

  • Gruesome_16_na.jpg
    Gruesome_16_na.jpg
    53.3 KB · Views: 0
Looks pretty good to me! I've only attempted to do one and that's the "OKLAHOMA GAL" on the C-47. Wanted to see if I could do one.
 
Looks pretty good to me! I've only attempted to do one and that's the "OKLAHOMA GAL" on the C-47. Wanted to see if I could do one.

Thanks TuFun!

This is a big project I'm doing. A lot of trial and error. I too wanted to see if I could do one, mainly out of necessity and to see if my goal of doing them for an entire bomb group was even feasible.

I am encouraged.

Thanks,
Joe
 
This is just a pic of the nose art itself not placed yet on the plane. I put it on a green background for effect. I don't know the correct way to paint nose art or how others do it, but I loaded a photo of the art and the created a new layer. In the new layer I just colored as in a coloring book: outline and then fill in. The colors are of course artistic license as this was painted from a black and white photo. I tried to judge colors by tonal quality. May not be an exact or realistic color interpretation but I thinks these colors work well.
That is exactly how I've been doing it for years. I hardly ever just copy and paste from a picture to the texture.
I enlarge it quite a bit and then trace a new one using as many layers as there are colors and as extra details warrant.
Putting a color background that matches where it will go on the aircraft is an important step because you will be reducing
the size to fit and that will make cleanup much easier.

Nice work.
:ernaehrung004:

I do the same. I've mucked about with a copy/paste, but rarely can I make it look as good as I can by tracing it in different layers in a larger size, then shrinking it to fit.
 
Yep, same here. Also couldn't find a straight on view and due to being skewed, had to draw artwork based on the rivet pattern of the real aircraft. And there was two version of the same artwork to boot.

Keep us posted on the other artwork you are doing, very interested in nose art!
 
That is exactly how I've been doing it for years. I hardly ever just copy and paste from a picture to the texture.
I enlarge it quite a bit and then trace a new one using as many layers as there are colors and as extra details warrant.
Putting a color background that matches where it will go on the aircraft is an important step because you will be reducing
the size to fit and that will make cleanup much easier.

Nice work.
:ernaehrung004:

guilty as charged
 
Yep, same here. Also couldn't find a straight on view and due to being skewed, had to draw artwork based on the rivet pattern of the real aircraft. And there was two version of the same artwork to boot.

Keep us posted on the other artwork you are doing, very interested in nose art!

Well as per request here are two I did yesterday amid household chores.

attachment.php

The Topper. A B-24D of the 371st BS.


attachment.php


Wolf Pack, a B-24D of the 371st BS

I very much appreciated the interest and encouragement. These are fairly "easy" for me because the don't have any human form. I think those with pinups will be a sight more difficult.

I am concerned with how they will look once they are on the plane. I will try to get to that today time permitting.

Thanks,

Joe
 

Attachments

  • The _Topper.jpg
    The _Topper.jpg
    47.5 KB · Views: 0
  • Wolf_Pack.jpg
    Wolf_Pack.jpg
    72.5 KB · Views: 0
As I am painting AI planes for 4 squadrons ( 50 + planes) for my Pitoe Drome project, I decided to cut down on a lot of work by making 4 base textures, 1 for each squadron with the Long Rangers logo and their distinctive tail fin stripe. Then the only layer copying and pasting I have to do are the nose art and plane numbers.

This is actually turning out to be interesting and not as much as a drudge that I thought it would be.

Joe
 
Here is The Topper as seen on the plane in the sim.

attachment.php


These textures were saved as DDS DXT3. They have no alpha. I think something is wrong with the windows: reflective but not transparent. I will look into that to see what I did wrong.

attachment.php


I also thing that the paint is too flat. Is having no alpha the cause of that? Can it be fixed with an alpha.

Concerning alphas: The lighter the gray, the more reflective, right?

I appreciate any comments, helpful hints etc.

Thanks in advance.

Joe


I am going to fly.
 

Attachments

  • jm f-2017-nov-12-004.jpg
    jm f-2017-nov-12-004.jpg
    77.2 KB · Views: 0
  • jm f-2017-nov-12-005.jpg
    jm f-2017-nov-12-005.jpg
    97.1 KB · Views: 0
In the paintkit folder is an alpha for a reflective alpha bmp, but if you open one of the painted texture files with DXTBMP
you can see the alpha for it. As for the glass being glazed over it is on the bottom right side and needs to be gray in color.
I created a alpha psd file for the paintkit and do all my alpha work thru it. Then I use dxtbmp to import the alpha to the
texture I am working on.
I have reworked the paintkit to better line up the panel lines (the tail was way off) and added some detail to it. I'll post a
pic or 2 once I have finished it. This is for the reflective J model but should translate to the D very easily.

edit....
This is where the paintkit sits as of today. You can see the Glass at the bottom right and marked. You can also see all
the extra detail I added plus all the new panel line work on the tail and bombay.

B-24PSD.jpg


Joe

Hi Joe,

When I loaded a D model into DXTBMP I never noticed the spot in the upper right for the window in the alpha. This is now fixed in my repaints.

My nose art seems a bit ragged close up. I will see if that can be remedied by repainting the art larger before I add it.

The paint kit rework looks VERY good. I can definitely see all the extra detail. Keep up the good work.

Thanks for the advice,

Joe
 
Back
Top