• There seems to be an uptick in Political comments in recent months. Those of us who are long time members of the site know that Political and Religious content has been banned for years. Nothing has changed. Please leave all political and religious comments out of the forums.

    If you recently joined the forums you were not presented with this restriction in the terms of service. This was due to a conversion error when we went from vBulletin to Xenforo. We have updated our terms of service to reflect these corrections.

    Please note any post refering to a politician will be considered political even if it is intended to be humor. Our experience is these topics have a way of dividing the forums and causing deep resentment among members. It is a poison to the community. We appreciate compliance with the rules.

    The Staff of SOH

  • Server side Maintenance is done. We still have an update to the forum software to run but that one will have to wait for a better time.

inner flaps texture for mz-spitfire5.zip

Pierre_NC

Members +
Hello all,

I've set my choice on the mz-spitfire5.zip from Hagochu (Akemi Mizoguchi) mz_hago. A perfect plane that flies wonderfully, quite pleasant to paint, no texture distorsions at all, a real beauty from an awesome designer.

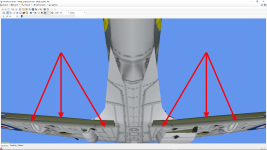
The only question I have though is about the location of the wings inner flaps (above and below) textures on the bitmaps (see the picture below). I was not able to find them and I would like to give them both another color, possibly with panel lines and rivets.

If anyone knows where they are, could you kindly point them to me, please ?

Thank you so much for your kind help and cooperation.

Pierre_NC.
 

Attachments

  • mz-spitfire5.png
    mz-spitfire5.png
    444.4 KB · Views: 108
To fin the texture file, change the view mode in MCX to wireframe and open the materials editor (and check the box to highlight the selected texture on the model) and it will show you which one the part is on.

It's a little more difficult to find out where it is on the sheet itself.

One way is to use MCX to export the model in .dae format and then import it into Blender. Once it's open in Blender, you can look at the part with Blender in UV Editor mode. This will show you the UV map, which you can export if you want.

Another way to find the location is to use FSRepaint by Abacus (it's payware but not expensive) and make test edits to the texture sheet until you find the correct spot on the model.
 
To fin the texture file, change the view mode in MCX to wireframe and open the materials editor (and check the box to highlight the selected texture on the model) and it will show you which one the part is on

This will help me a lot, awstub. Thank you very much for answering me so quickly.
 
Back
Top